EnviroVent Silent 100 Installation Guide: A Comprehensive Plan
This guide details installing the EnviroVent Silent 100, a powerful extractor fan for bathrooms and WCs. It covers wall and ceiling mounting, electrical connections, and ensuring optimal airflow for improved indoor air quality.
Understanding the EnviroVent Silent 100
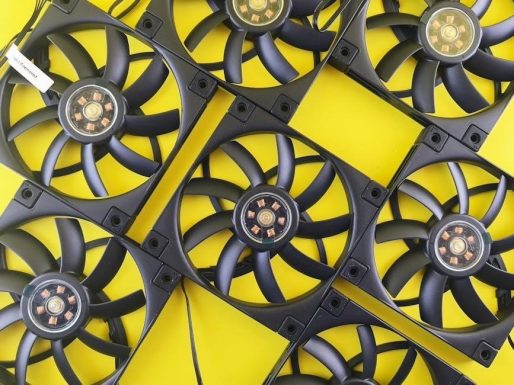
The EnviroVent Silent 100 is a 100mm axial extractor fan specifically engineered for domestic use, primarily in bathrooms and WCs. It’s designed to effectively address ventilation challenges, removing moisture and odours to create a healthier indoor environment. As a product from a leading UK manufacturer – EnviroVent – it benefits from over 35 years of experience in combating condensation and mould issues in homes.
This fan isn’t just about eliminating unpleasant smells; it’s a crucial component in improving indoor air quality. EnviroVent’s commitment to quality is demonstrated through rigorous testing of all their ventilation products. The Silent 100 is suitable for both wall and ceiling installations, offering flexibility during the installation process. It’s a powerful yet quiet solution, making it ideal for spaces where noise is a concern.
Furthermore, the Silent 100 is part of a broader range of ventilation systems offered by EnviroVent, including more comprehensive solutions like Positive Input Ventilation (PIV) and Mechanical Ventilation with Heat Recovery (MVHR). However, the Silent 100 provides a targeted, cost-effective solution for localized ventilation needs.
Key Features and Specifications
The EnviroVent Silent 100 boasts several key features designed for optimal performance and ease of use. As a 100mm axial fan, it delivers a substantial airflow rate while maintaining a remarkably quiet operation – a core benefit highlighted in its name. It’s specifically designed for domestic environments, making it suitable for a wide range of bathrooms and WCs.
Key specifications include: a 100mm diameter connection, compatibility with standard 100mm ducting, and a robust construction ensuring durability. The fan is designed for both wall and ceiling mounting, offering installation versatility. While specific airflow rates and sound levels vary, EnviroVent prioritizes quiet operation in this model.
The Silent 100 is a powerful extractor fan, but it’s also relatively simple to install, making it a popular choice for both DIY enthusiasts and professional installers. It’s part of EnviroVent’s broader portfolio, which includes more advanced systems like MVHR, but stands alone as an effective solution for targeted ventilation. Detailed specifications are available for download as a PDF from EnviroVent’s resources.
Safety Precautions Before Installation
Prioritizing safety is crucial before commencing any electrical work or installation. Always disconnect the mains power supply to the circuit you’ll be working on at the consumer unit – this is non-negotiable. Verify the power is off using a suitable voltage tester. If you are uncomfortable working with electricity, engage a qualified electrician.
Ensure the installation location is free from obstructions and that the ceiling or wall can adequately support the fan’s weight. Wear appropriate personal protective equipment (PPE), including safety glasses and gloves. Be mindful of concealed wiring or plumbing within the installation area; use a cable detector to avoid accidental damage.
Carefully read and understand all instructions provided with the EnviroVent Silent 100. Do not attempt to modify the fan in any way. Ensure the ducting you intend to use is compatible with the fan and meets relevant building regulations. Finally, be aware of the weight of the unit during installation to prevent strain or injury.
Tools and Materials Required
Successful installation of the EnviroVent Silent 100 demands having the correct tools and materials readily available. You will need a screwdriver set (Phillips and flathead), a drill with appropriate drill bits for your wall/ceiling type, and a cable stripper/cutter.
A voltage tester is essential for confirming power disconnection. A pencil and measuring tape will aid in accurate marking and positioning. Ducting (100mm diameter) and ducting tape are required for connecting the fan to the outside. Consider using ducting insulation to minimize heat loss.
Electrical connection will necessitate suitable electrical connectors or a junction box. Wall plugs and screws appropriate for your wall/ceiling material are also vital. A ladder or step stool will be needed for ceiling installations. Finally, a cable detector is highly recommended to avoid damaging hidden wiring or plumbing during the process. Ensure all materials comply with relevant safety standards.
Planning the Installation Location
Careful planning is crucial for optimal performance of your EnviroVent Silent 100. Prioritize locations that directly address moisture and odour sources – typically bathrooms and WCs. Consider proximity to the shower or bath; however, avoid direct water spray.

Ensure the chosen location allows for unobstructed airflow. Avoid corners or areas with limited space. Check for existing obstructions like joists or pipes within the wall or ceiling cavity. Accessibility for future maintenance is also important. The fan should be positioned to effectively extract air without creating drafts.
For wall mounting, a height of approximately 2m is generally recommended. Ceiling mounting should avoid areas directly above light fixtures. Plan the ducting route to minimize bends and length, as these reduce airflow efficiency. Always comply with building regulations regarding ventilation and electrical installations.
Wall Mounting Considerations
When wall mounting the EnviroVent Silent 100, structural integrity is paramount. Ensure the wall material can securely support the fan’s weight, especially if mounting on drywall or plasterboard – use appropriate fixings. Locate wall studs for a more robust installation, or utilize suitable wall anchors.
Maintain a minimum distance from any water source to prevent electrical hazards. Consider the aesthetic impact; the fan’s position should be visually acceptable. Ensure sufficient space around the fan for easy access for cleaning and maintenance. The intake grille must remain unobstructed for optimal airflow.
Pre-drilling pilot holes is recommended to prevent damage to tiles or wall surfaces. Verify the wall is level before securing the mounting bracket. Double-check all fixings are tightened securely. Proper sealing around the fan housing can prevent moisture ingress and improve efficiency. Remember to adhere to all relevant building regulations.
Ceiling Mounting Considerations
For ceiling installation of the EnviroVent Silent 100, assess the ceiling joist structure. Securely mounting to a joist is crucial for stability and preventing vibrations. If a joist isn’t directly accessible, employ appropriate ceiling anchors designed for the weight of the fan.
Ensure adequate clearance around the fan – a minimum of 600mm from light fixtures and other obstructions is generally recommended. Consider the ceiling height; lower ceilings may require a flush-mounted installation to maintain sufficient headroom. Proper ventilation is key; avoid positioning the fan where airflow will be restricted by sloping ceilings or bulkheads.
When cutting the ceiling opening, exercise caution to avoid damaging electrical wiring or plumbing. Use appropriate safety gear, including eye protection. Seal any gaps around the fan housing to prevent drafts and moisture ingress. Verify the ceiling surface is clean and dry before mounting the fan bracket. Always switch off the power supply before commencing any electrical work.
Electrical Connection Requirements
The EnviroVent Silent 100 requires a 220-240V AC power supply. Installation must be performed by a qualified electrician, adhering to all local building regulations. Before commencing any electrical work, always isolate the power supply at the consumer unit.
The fan typically utilizes a standard three-core cable for connection: Live (Brown), Neutral (Blue), and Earth (Green/Yellow). Ensure correct identification of these wires before connecting them to the fan’s terminal block. Incorrect wiring can cause damage to the fan or create a safety hazard.

Consider incorporating a double-pole switching mechanism for convenient fan control. If the fan is to be connected to a timer or humidistat, ensure the device is rated for the fan’s current draw. All connections should be securely tightened within the terminal block, and the cable entry point should be sealed to prevent moisture ingress. Double-check all connections before restoring power.
Step-by-Step Installation Process ౼ Wall Mounting
Begin by marking the wall at the desired fan location, ensuring sufficient space for ducting and access for maintenance. Use the fan housing as a template to mark the screw holes. Drill pilot holes and insert appropriate wall plugs for a secure fit.
Carefully position the fan housing against the wall, aligning it with the pre-drilled holes. Securely fasten the housing using screws, ensuring it’s flush against the wall surface. Connect the ducting to the fan’s outlet, using appropriate fittings and sealant to prevent air leaks.
Proceed with the electrical connection (refer to the ‘Electrical Connection Requirements’ section). Once the wiring is complete and verified, carefully tuck the wires into the fan housing. Finally, attach the front cover of the fan, ensuring it clicks securely into place. Test the fan’s operation after restoring power.
Step-by-Step Installation Process ౼ Ceiling Mounting
Start by identifying a suitable joist or strengthening the ceiling area to support the fan’s weight. Mark the ceiling where the fan will be positioned, using the housing as a template for screw holes. Drill pilot holes and install appropriate ceiling fixings – ensuring they are robust enough to hold the unit securely.
Carefully lift the fan housing into position, aligning it with the pre-drilled holes. Securely fasten the housing to the ceiling using screws, verifying it’s firmly attached and level. Connect the ducting to the fan’s outlet, employing suitable fittings and sealant to maintain airtight connections.

Complete the electrical wiring (refer to the ‘Electrical Connection Requirements’ section for detailed guidance). Once the wiring is confirmed as safe and correct, neatly tuck the wires inside the fan housing. Finally, attach the fan’s front cover, ensuring a secure and flush fit. Test the fan’s functionality after power restoration.
Connecting the Ducting
Proper ducting is crucial for efficient airflow and preventing moisture buildup. Begin by selecting the correct diameter ducting – typically 100mm for the Silent 100 – and ensure it’s compatible with the fan’s outlet. Smooth, flexible ducting is recommended to minimize airflow resistance;

Securely attach the ducting to the fan’s spigot using a hose clamp, ensuring a tight and airtight seal. Extend the ducting to an external vent, avoiding sharp bends or excessive length, as these can reduce airflow. Insulate the ducting if it passes through cold areas to prevent condensation.
When terminating externally, use a suitable vent cover with a backdraft damper to prevent external air from re-entering the property. Seal all ducting joints with appropriate sealant or foil tape to maintain airtightness. Regularly inspect the ducting for any damage or blockages, ensuring optimal performance.
Ensuring Proper Airflow
Optimal airflow is paramount for the EnviroVent Silent 100’s effectiveness. Avoid obstructions near the fan’s intake and exhaust, ensuring clear pathways for air movement. Minimize ducting length and bends, as these significantly reduce airflow efficiency. Smooth, flexible ducting is preferable to rigid alternatives.
Verify the external vent isn’t blocked by debris, foliage, or snow. A restricted vent drastically diminishes the fan’s performance. Consider the room’s size and ventilation requirements; larger rooms may necessitate additional ventilation solutions alongside the Silent 100.
Regularly check the fan’s operation to confirm it’s extracting air effectively. Listen for any unusual noises that might indicate a blockage or malfunction. Proper airflow not only removes moisture but also improves indoor air quality, contributing to a healthier living environment. Maintaining clear pathways is key to sustained performance.
Testing the Installation
Post-installation testing is crucial to verify the EnviroVent Silent 100 functions correctly. Begin by carefully inspecting all electrical connections, ensuring they are secure and compliant with safety regulations. Power on the unit and listen for any unusual noises – humming, rattling, or grinding – which could indicate a problem.
Assess airflow at the exhaust vent. You should feel a noticeable extraction when the fan is running. Use a tissue or smoke stick (with caution) near the fan intake to visually confirm air is being drawn in. Check for any air leaks around the fan housing or ducting connections.
Test any humidity sensors or timers, if installed, to ensure they activate the fan as intended. Confirm the fan switches off automatically when the set parameters are met. Thorough testing guarantees optimal performance and a long-lasting, effective ventilation solution, improving indoor air quality.
Troubleshooting Common Issues
If the EnviroVent Silent 100 fails to operate, first check the power supply and ensure the circuit breaker hasn’t tripped. Verify all electrical connections are secure. A humming sound but no fan rotation suggests a potential motor issue – professional assistance may be required.
Reduced airflow can stem from blocked ducting or a dirty fan impeller. Disconnect power and carefully inspect the ducting for obstructions. Clean the impeller with a soft brush, removing any dust or debris. Ensure the exhaust vent isn’t blocked externally.
For timer or sensor malfunctions, consult the user manual for reset procedures. If issues persist, check the sensor’s positioning and sensitivity settings. If problems continue, contacting EnviroVent support is recommended. Regular maintenance and prompt troubleshooting ensure continued efficient operation and optimal indoor air quality.
Maintaining Your EnviroVent Silent 100
Regular maintenance is crucial for optimal performance and longevity of your EnviroVent Silent 100. At least twice a year, disconnect the power supply and carefully remove the fan cover. Inspect the impeller and housing for dust and debris accumulation.

Clean the impeller gently using a soft brush or vacuum cleaner attachment. Avoid using harsh chemicals or abrasive cleaners, as these can damage the fan components. Check the ducting for any blockages or kinks that may restrict airflow. Ensure the external vent is clear of obstructions like bird nests or foliage.

Periodically inspect the electrical connections to ensure they remain secure. A well-maintained EnviroVent Silent 100 will continue to provide effective ventilation, improving indoor air quality and preventing condensation and mould growth. Following these simple steps will maximize its lifespan and efficiency.
EnviroVent Warranty Information
EnviroVent stands behind the quality of its products, including the Silent 100 extractor fan. A standard warranty is provided with each unit, covering defects in materials and workmanship. The duration of the warranty typically begins from the date of purchase, or the date of installation if professionally installed, whichever is later.
The warranty covers repair or replacement of the faulty unit, at EnviroVent’s discretion. It does not cover damage caused by improper installation, misuse, neglect, accidental damage, or unauthorized modifications. To make a warranty claim, you must provide proof of purchase and a detailed description of the fault.
Professional installation is recommended to ensure the warranty remains valid. Retain your installation documentation as proof. For complete warranty terms and conditions, and to register your product, please visit the EnviroVent website or contact their customer support team. This ensures a smooth claims process if needed.
Contacting EnviroVent Support
For assistance with your EnviroVent Silent 100 installation or any related queries, EnviroVent offers multiple support channels. They are the UK’s leading manufacturer, supplier, and installer of residential ventilation systems, and their team is readily available to help.
Homeowners and landlords can reach EnviroVent via telephone during business hours. Dedicated support lines are available for specific inquiries, ensuring you connect with the appropriate expert. Alternatively, you can submit your questions through the online contact form on their website, receiving a prompt response from their customer service team.
The EnviroVent website (search online for EnviroVent) also features a comprehensive FAQ section and downloadable resources, including manuals and troubleshooting guides. For more complex issues, or to discuss ventilation specifications, consider contacting their technical support department. They aim to take the hassle out of ventilation!